[Weekly Review] 2019/12/09-15
- 2019/12/09-15
2019/12/09-15
Last week, I finished the draft version of the matrix sum with Chisel and became half-familiar with it. Also, I tried to write a functional test with Chisel-tester2. Unfortunately, due to the complex and unstable environment, I can not check all the syntax or run the functional test, but I tried to use the environment in Jupyter to run a simple test and two small submodules had been proved right. To use Chisel and Chipyard's components, I studied one sample project named SHA3. If I have more time, I'd back here to restudy that.
Fortunately, while I was programming the matrix sum project, I realized the feeling of distinguishing the difference of Scala types and hardware types. I mean, I knew why we can utilize the features of Scala to boost our efficiency of design our circuits and when we should create a hardware register to store our mediate data, why the hardware type UInt can not be translated to the Scala type Int. Just because Scala is the hardware generator, it's a software programming language, its types exist when we build the project. But as for hardware types, they only exist when the circuits running. So we can not get an unknown value and translate it to a must-know value.
So this week, I'll try to finish the related C files and run the simulation on FPGA boards. Also, I need to learn some Scala programming skills to enhance my Chisel coding ability.
Git Command
some useful command and the explanation of git.

the workflow
-
Workspace
-
Index/Stage
-
Repository
-
Remote
Build a git project
Create one new project
git init [project-name]
Config
show current git config: git config --list
add/remove files
These files will be added or removed to Index.
git rm/add [file1] [file2]
git mv [file-original] [file-renamed]
Commit codes from Index to Repository
These commands will update all the changes from Index to Repository.
git commit -m 'yourmessage'
git commit -v to show all the differences.
Push codes from Repository to Remote
git push [remote] [branch] to push one of the local branches.
git pull [remote] [branch] to get the Remote codes into your workspace.
Show Information
git status to check all the changed files
git log to show the current branch's changelog
git diff to show the differences between the Workspace and Index
git diff HEAD to show the difference between the Workspace and Repository
git diff --shortstat "@{0 day ago}" to show your daily coding lines number
git branch: show the current branches
git remote -v show the remote information
Other Git Commands
git pull origin master: download the newest project from remote and merge it into the current branch.
git stash: ignore the current changes and then can switch to another branch.
git checkout [branch]: switch to another branch
git checkout -b [new branch]: switch to a new branch
git merge [branch]: merge the branch to master
git branch -d [branch]: The -d option stands for --delete, which would delete the local branch, only if you have already pushed and merged it with your remote branches
git branch -D [branch]: The -D option stands for --delete --force, which deletes the branch regardless of its push and merge status
Matrix Sum Accelerator
This is the lab project in fall 2013 of UCB.
Chisel3 Syntax
We can check the syntax at its official website. Here lists some high efficient and frequently used syntaxes. And also I printed Chisel3 Cheat Sheet which greatly save my time.
-
Vec -
Seq -
Queen -
DecoupledIO -
PriorityEncoder -
SyncReadMem -
Flipped
(Linux) C Syntax
asm volatile
asm volatile is the inline assembly that used in language Linux C. asm is the keyword of gcc and volatile means gcc don't need to optimize the assemble codes. There is a brief introduction of this. And I found this term while I was trying to test the custom extensive instructions with RoCC interface. This syntax can run our instruction without change the compiler. Plus, it can help our C program to run several commands in order with the help of asm volatile("" ::: "memory").
This syntax also has a feature named Atomic. That means this command only has to states in runtime: either success or failure.
create a C matrix with 2-D Array
Define and initialize the matrix:
double matrix[10][15];
//initialize the static matrix
for (i=0;i<10;i++)
{
    for(j=0;j<15;j++)
    {
        matrix[i][j]=0;
    }
}


// define the struct, need a pointer. m means row and n means column
typedef struct
{
    double **mat;
    int m, n;
}matrix;

//apply for memory space, use malloc()
void initial(matrix &T,int m,int n)
{
    int i = 0;
    T.mat = (double **)malloc(m*sizeof(double *));
    for (i = 0; i < m; m++)
    {
        T.mat[i] = (double *)malloc(n*sizeof(double));
    }
    T.m = m;
    T.n = n;
}

//initialize the matrix with the zero element.
void initValue(matrix &T, int m, int n)
{
    int i, j;
    initial(T,m,n);
    for (i = 0; i < m; i++)
    {
        for (j = 0; j < n; j++)
        {
            T.mat[i][j] = 0;
        }
    }
}

//free the memory space
void destroy(matrix &T)
{
    int i;
    for (i = 0; i < T.m; i++)
    {
        free(T.mat[i]);
    }
    free(T.mat);
}
//finished
Pointer and address access
This blog describes and interprets the usage of * and & to get the address of one data or get the corresponding value of the address.
RISC-V SPEC
Chipyard
SHA3
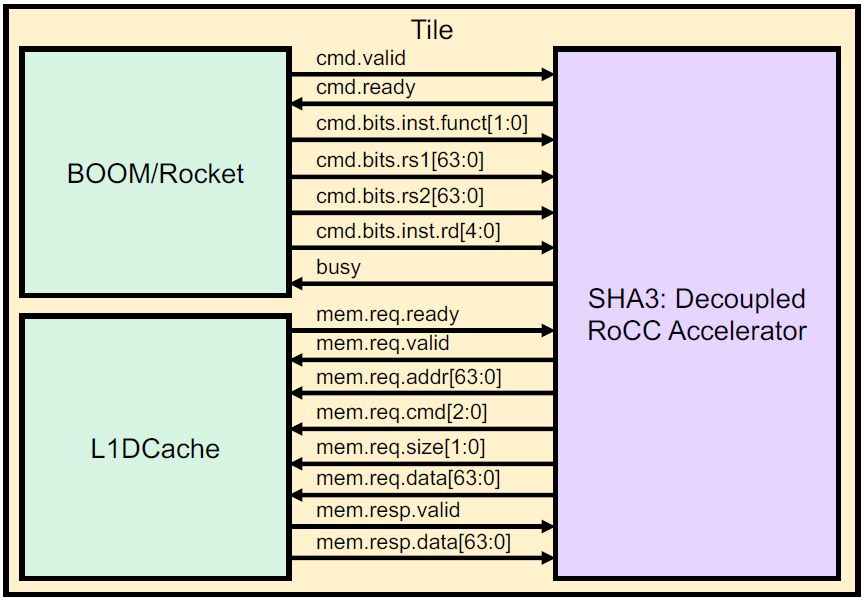
I mimicked SHA3, which also acts as one official sample to use RoCC. To write my accelerator, I had to study the SHA3 project.
If one wants to harness RoCC interface to add extensive instructions, he must design his Chisel hardware project firstly and then write some C tests to prove this project works. Then modify some C files to let the compiler utilize your new instructions.
SHA3-Chisel
sha3.scala
This is the top module of SHA3 project.
ctrl.scala
This is the most complex submodule of SHA3 project. It contains how to decode the instructions, as well as three finite-state machines. One (rocc_s) shows the states of the communication between the control module and the CPU(or receives instructions from CPU and uses ready-valid signals to show some states of the accelerator); One (mem_s) shows the states of the communication between the control module and the memory(or receives data from memory and send data back to memory and also ready-valid signals); The last one (state) shows the states of the communication between the control module and its submodules.
dpath.scala
This is the data path of the whole module.
dmem.scala
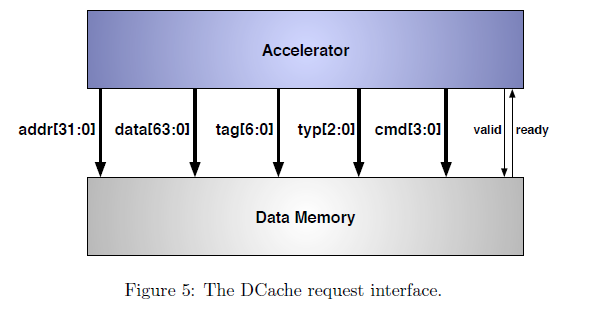
This is the module responsible for transform data between memory and the accelerator. So we can use this module with just a slight modifying.

SHA3-test
Hwacha
Hwacha is another more complex sample of custom extensive instructions. Plus, it also used as a component to realize the RISC-V Standard Vector instructions. But it's quite complex and time tiny, so I didn't learn it thoroughly last week.
Hwacha-Chisel
RoCC and extension instruction
RoCC component
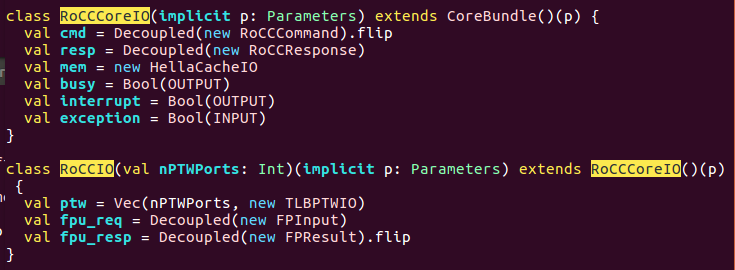
RoCC interface includes two main IO, one is for processor core and the other is for cache or memory. Due to the feature of Scala, we can use io.cmd and io.mem to show this. And both IOs own several kinds of signals, such as io.cmd.valid io.cmd.ready and io.cmd.bits, also the io.mem.req and io.mem.resp.
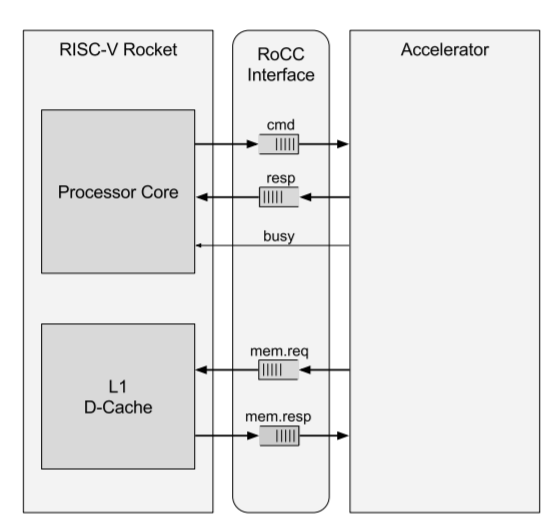
We can see it in more details from the photo below. NOTE: this graph is a little old as it was published in 2015, and there are several slight changes.
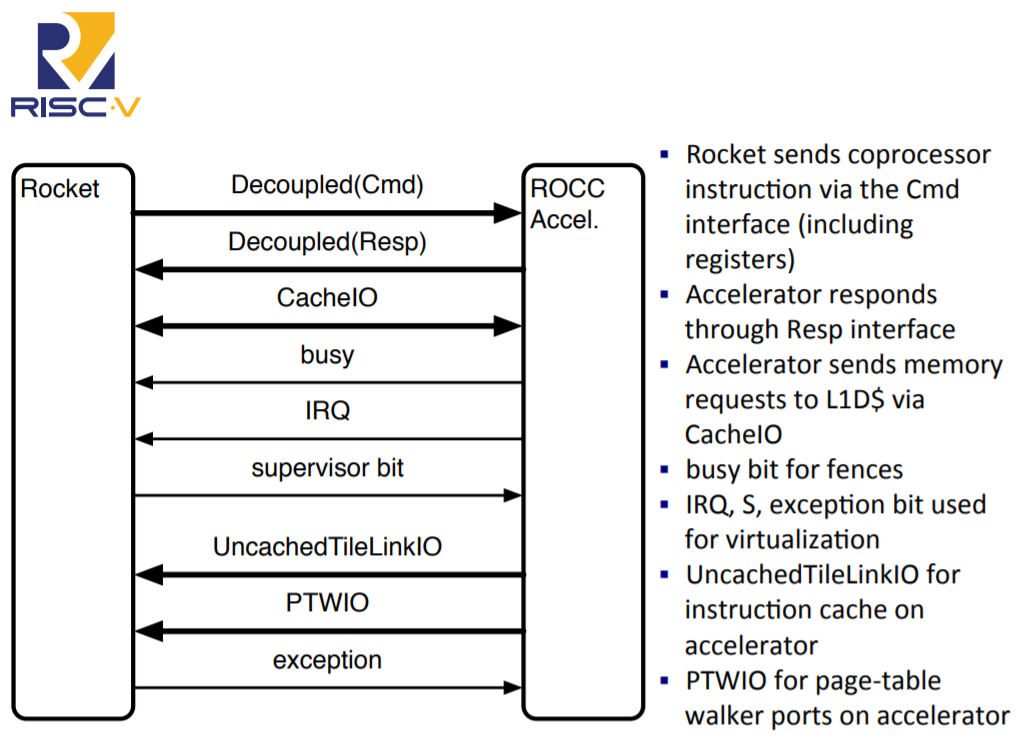
extension instruction with RoCC
The table below shows the RoCC instruction format.

RoCC-Chisel
Instruction test with C
Tests for example Rocket Custom Coprocessors
HellaCache
Chisel-Tester2
Hammer
Computer Architecture
Memory Fence and Memory Barrier
Page Table Walk
PTW Introduction
Translation Lookaside Buffer
TLB Introduction
With the help of TLB, the CPU may access the physical address with just one accessment. And it contains both some copies of the page table and the physical address.
TLB passthrough
When I looked through the TLB.scala I found a valuable named passthrough
Cache Hierarchy
I found the following information when I tried to understand the meaning of memory tag. I met this term while I was trying to mimic the control module of SHA3. Because it extends from HellaCache, which require a tag. Although finally, I found I can give out tag casually, I learned a lot from the structure of cache including TLB.
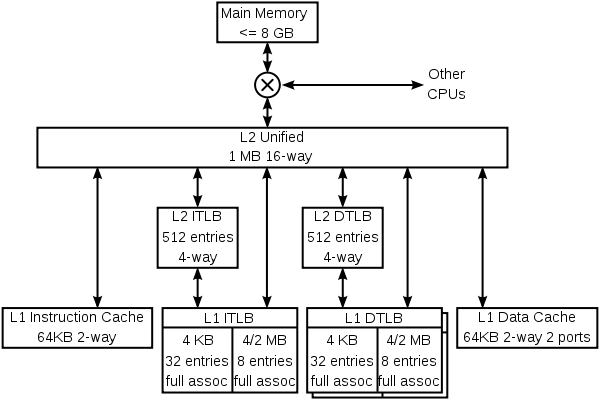
The picture above illustrates the abstract architecture of the cache hierarchy of one AMD CPU, from which we can see TLB and Cache. Both these two components contain two levels and save instructions and data separately.
If we see memory hierarchy excluding TLB, then it looks like the following picture:

And because of the dramatically booming speeds of high-level caches, they can improve the performance of the CPU. We can regard the cache is a method to improve the R/W speed of main memory, the CPU register is a method to improve that of the cache.

So how can the cache controller know whether the data we need is included in current cache? So tag comes.

We can see from the graph above, there is a tag array and its corresponding data array. Firstly, the controller will use the index to find a cache line and then compares the tag array, then bingo.
Sinaean Dean introduced the two usages of cache tag:
-
For caches parallelly connected, using tags as a selection signal in a MUX to choose the right data.
-
Know whether cache hits or misses.
If the cache miss, then it will ask a lower lever cache for the data or instructions.

Memory Read (Synchronous and Asynchronous)
This blog describes the synchronous memory – SSRAM, which is controlled by the clock and can not read or write at the same clock cycle. But if we use asynchronous memory, then we can get the read data within one clock and if we use a combinational/asynchronous-read, sequential/synchronous-write memory, then the read-after-write hazards are not an issue.
Some Trouble
psutil
ERROR INFO: No module named psutil.
But I have installed this module. Then via some blogs, I find that might be the version of python that excursive doesn't install the module. So I changed the default version of python from 2.7 to 3.5 and reinstall it with pip3.
Import classes into IntelliJ IDEA
I use some modules of chipyard, which means I have to import that project into my project.
In the beginning, I just add the files which contain the Scala files directly, but it didn't work at all. Because the packages and classes are defined at a more high level.
By accidentally, I included the highest file (generator in this case) and it succeeds.
Import reliance into sbt project
lazy val matrixsum = conditionalDependsOn(project in file("/home/singularity/chipyard/generators/matrixsum"))
				.dependsOn(rocketchip, chisel_testers, sifive_blocks, sifive_cache, utilities, midasTargetUtils)
				.settings(commonSettings)
But that's works on the top module, the dependson must be a subfile of the current build.sbt directory.
Can not find the lvy local lib
Haven't solved yet
Solved at Dec 28th by republishing it with the value of version := 1.2-SNAPSHOT in build.sbt.
1 targets failed
adder.compileClasspath
Resolution failed for 1 modules:
--------------------------------------------
				edu.berkeley.cs:treadle_2.12:1.2-SNAPSHOT
				not found: /home/singularity/.ivy2/local/edu.berkeley.cs/treadle_2.12/1.2-SNAPSHOT/ivys/ivy.xml
				not found: https://repo1.maven.org/maven2/edu/berkeley/cs/treadle_2.12/1.2-SNAPSHOT/treadle_2.12-1.2-SNAPSHOT.pom
				not found: https://oss.sonatype.org/content/repositories/releases/edu/berkeley/cs/treadle_2.12/1.2-SNAPSHOT/treadle_2.12-1.2-SNAPSHOT.pom