[Tutorial] Python Hardware Behaviour Model
Python Hardware Behaviour Model
What
The Python hardware behaviour model is developed to explore the design space and conform that the function of this hardware architecture is theoretically correct.
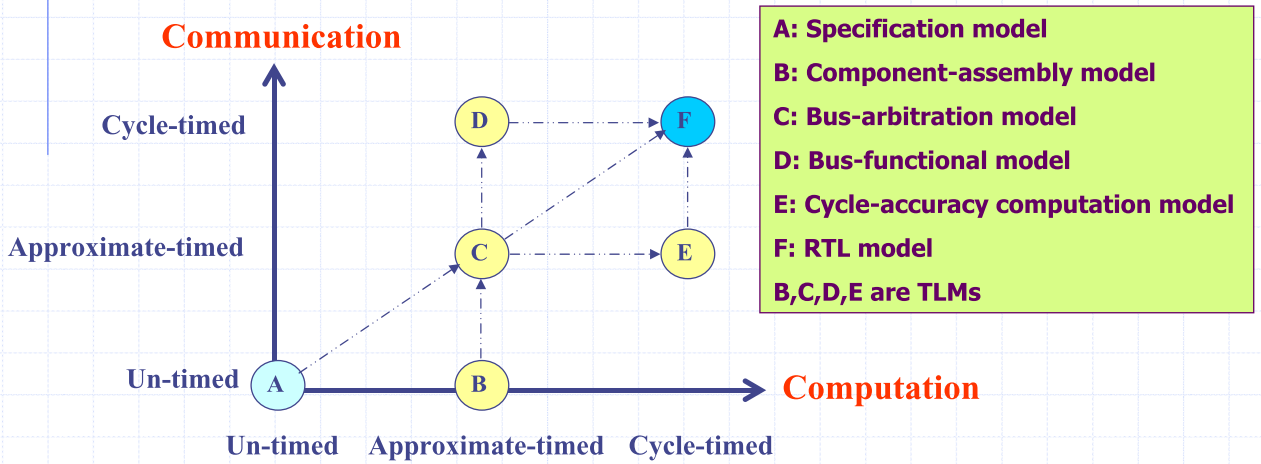
In my understanding, this model can be one of C/D/E/F depends on your requirements and coding style.
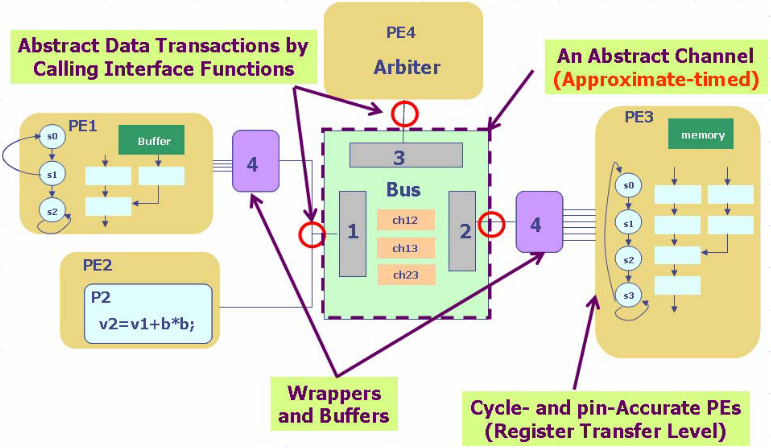
As for me, I prefer the model E, which
- Dedicated hardware IPs are modelled at register transfer level
- Wrappers convert data transfer from higher level of abstraction (abstract bus) to lower level of abstraction (PEs)
You can find more details in this post: Different Abstraction Models.
Why
Easy to develop without considering data width and type
Compared with professional model and simulation language SystemC and behaviour Verilog, I think one thing can accelerating the modelling is that you do not need to specify the data width of each component, which usually causes bugs in the circuit. We can explore the data width later but not when we can to verify the hardware algorithm and get the briefly performance.
Easy to hybrid simulate with software algorithms
As many algorithms are developed in Python, the circuit we're modelling might need the outputs of those Python program.
So if we write a Python model, it is easy for us to simulate it with software algorithms.
Easy to change the architecture
When we change the hardware architecture, one essential obstacle is the changing ports.
Unlike SystemC and Verilog, you don't need to declare the detailed input and output ports. In Python, the type of a function API can be changed swiftly, e.g., from int to float, from int to list, from list[int] to list[list[int]], etc.
Easy to debug
Benefit from the Python syntax and libraries, we can easily print the log information of the signals, the values in the registers/memory or even the contents of the FIFOs/memory etc with something like SystemVerilog Assert to check the computation results.
You can also monitor the circuit and make the debugging visible by drawing a dynamic graph using matplotlib.pyplot.
Easy to explore the design space
You can parameterise the model and also make the exploration visible by drawing a graph.
And as long as you return the data with similar structure, you can easily comparing the performance of different submodules in different algorithm.
Help to understand what is hardware circuit and what is software program
Just as one popular saying in Chinese IC area: "there are five stages of learning Verilog"
- 00: no circuit in mind, no circuit in code
- 01: circuit in mind, no circuit in code
- 10: circuit in mind, circuit in code
- 11: no circuit in mind, circuit in code
- 00: no circuit in mind, no circuit in code
Using pure software language to describe the hardware model is able to help you understand which code block is your circuit and which code block is just some software glue, hence you can reach the state 01 and 10.
How
As another popular saying in Chinese IC area: "code in hand, circuit in mind, timing in head", I think the essential thing is that you should keep in mind which are your hardware components and which are the software tools that help you to structure your model and trigger them.
You need to keep in mind what is the function of the hardware component.
One method is making the hardware variables and function be private by using __ as the prefix of your hardware variables and function methods.
Initlizing registers
One essential component in the circuit is the register. In Verilog, we may just say reg then there will be a register or explicitly state it as logic in SystemVerilog. So how can we describe the behaviour of a register in Python?
As we know, the function of the register is holding the value until the enable signal becomes true. Usually, the enable signal is the clock.
Therefore, we need some variables in Python to store the values cross time. We will use __init__ to achieve this.
Let's take an example of FIR filter as Chisel dose.1

class MovingAverage3:

    def __init__(self):
        self.__module_name = "MovingAverage3"
        self.__z1 = 0  # val z1 = RegNext(io.in)
        self.__z2 = 0  # val z2 = RegNext(z1)
Then, you can get the value of z1 and z2 by self.__z1 and self.__z2.
Here I use __ to say, this is a private variable that can only be accessed inside the class, as in hardware, the registers can only be accessed inside the module as well.
Write your logic
As the Chisel codes shown above, there are actually two wires where one connect the input to z1, another connect z1 to z2.
So in Python:
__in_z1 = __input
__z1_z2 = self.__z1
...
# update the registers at the end of the function

self.__z1 = __in_z1
self.__z2 = __z1_z2
Let's have a look at the Chisel code of this logic:
io.out := (io.in * 1.U) + (z1 * 1.U) + (z2 * 1.U)
So in Python, the logic would be:
__output = __input + self.__z1 + self.__z2
So the whole logic block should be:
__in_z1 = __input
__z1_z2 = self.__z1
__output = __input + self.__z1 + self.__z2
self.__z1 = __in_z1
self.__z2 = __z1_z2
Driving the clock and declare your IOs
In hardware, the values in the registers will be updated at the event of postage or negedge. In Python, this event is function call.
Each time you call the function, the registers will be updated. And the inputs of this function are input ports of this module, the return values are the output ports of this module.
def trigger(self, __input):
  # IOs in Chisel
  # val io = IO(new Bundle {
  # val in = Input(UInt(bitWidth.W))
  # val out = Output(UInt(bitWidth.W))
  #})
  __in_z1 = __input
  __z1_z2 = self.__z1
  __output = __input + self.__z1 + self.__z2
  self.__z1 = __in_z1
  self.__z2 = __z1_z2
  return __output
This method is accessible from outside, which is similar to the hardware, where only IOs are accessible.
Write a testbench
Here is our simple example of MovingAverage3 FIR filter.
class moving_average3:

    def __init__(self):
        self.__module_name = "MovingAverage3"
        self.__z1 = 0  # val z1 = RegNext(io.in)
        self.__z2 = 0  # val z2 = RegNext(z1)

    def trigger(self, __input):
      """
      :param __input: input
      :type __input: int
      :return: the output of FIR filter
      :rtype: int
      """
        # IOs in Chisel
        # val io = IO(new Bundle {
        # val in = Input(UInt(bitWidth.W))
        # val out = Output(UInt(bitWidth.W))
        #})
        __in_z1 = __input
        __z1_z2 = self.__z1
        __output = __input + self.__z1 + self.__z2
        self.__z1 = __in_z1
        self.__z2 = __z1_z2
        return __output
We can write a simple test bench like this:
if __name__ == '__main__':
  my_inputs = [x for x in range(100)]
  myfir = moving_average3()
  for t in range(102):
    my_output = myfir.trigger(my_inputs[t])
    print("[INFO] time %d Output %d" % (t, my_output))
More useful examples
Actually, the model above is a RTL model, for more complex transaction, you can wrapper the data and convert them into higher abstract level.
Below are some useful common hardware components.
FIFO
FIFO can be described as a List, where data is appended into the end of the list and pop out from the head of the list.
So we can Initlize an empty list:
class fifo_example:
    def __init__(self, f_fifo_size):
        self.__module_name = "MovingAverage3"
        self.__z1 = 0
        self.__z2 = 0
        self.__out_fifo = []
        self.fifo_size = f_fifo_size

    def trigger(self, __input, __in_valid, __out_ready):
        # I prefer to read them firstly then write in
        __output = 0
        __out_valid = len(self.__out_fifo) != 0
        if __out_valid & __out_ready:
            __output = self.__out_fifo.pop(0)
        # write in
        __in_ready = len(self.__out_fifo) < self.fifo_size
        if __in_ready & __in_valid:
            __in_z1 = __input
            __z1_z2 = self.__z1
            __cur_result = __input + self.__z1 + self.__z2
            self.__out_fifo.append(__cur_result)
            self.__z1 = __in_z1
            self.__z2 = __z1_z2
        # here you can also return the fifo contents for debugging
        return [__output, __out_valid], __in_ready
Multiplexer and XBar
There would be some multiplexers or XBars at top module. Usually I would describe its function as a private method instead of one class:
# inside a class
def __mux_example(self, __inputs, __select_cond):
    return __inputs[__select_cond]
It might be a little bit complex to describe the function of a XBar as there are some ready valid signals on both side.
The select signal of this example is the data value itself.
def __x_bar_example(self, __inputs, __out_readies):
    """
    :param __inputs: this is a list of inputs,
        where each element is a list,
        where the first element is valid and the second element is the data.
    :type __inputs: list[list]
    :param __out_readies: the ready signals from the output ports
    :type __out_readies: list[bool]
    """
    __target_busy = [False for _ in range(self.__x_bar_out_num)]
    __x_bar_outputs = [[False, 0] for _ in range(self.__x_bar_out_num)]
    __x_bar_in_readies = [False for _ in range(self.__x_bar_in_num)]
    for __in_idx in range(self.__x_bar_in_num):
        __target_out_idx = __inputs[__in_idx][1]
        # if this targeted output ports is not busy
        if not __target_busy[__target_out_idx]:
            __x_bar_outputs = __inputs[__in_idx]
            __target_busy[__target_out_idx] = True
            __x_bar_in_readies[__in_idx] = __out_readies[__target_out_idx]
    return __x_bar_in_readies, __x_bar_outputs
Module hierarchy
You can instance the sub module in __init__ likes the registers.
class top_fir_module:
    def __init__(self, f_fifo_size):
        self.__module_name = "Three_FIRs"
        self.__three_fir = [fifo_example(f_fifo_size) for _ in range(3)]
-
https://www.chisel-lang.org ↩